If you have questions or suggestions, please send us a message.
![]() Files that you delete go to the recycle bin of your system, normally do you empty the recycle bin regularly. The files are not readable but are not deleted from your system, but may be overwritten. They still remain on your system until they are overwritten by other files. And here we can then use Recuva to recover the files until they are overwritten.
Files that you delete go to the recycle bin of your system, normally do you empty the recycle bin regularly. The files are not readable but are not deleted from your system, but may be overwritten. They still remain on your system until they are overwritten by other files. And here we can then use Recuva to recover the files until they are overwritten.
With Recuva can accidentally deleted files, photos, music, emails, zipped files, video files, etc., again identify and recovery in Windows. It does not matter if it is a hard disk, an MP3 player or SD card from your digital camera, Recuva get it back!
After accidentally deleting files they should of course not be overwritten, otherwise they are damaged and the files can not be retrieved. It is therefore important to install the program before you lose a file, so by installing Recuva the file can not be overwritten.
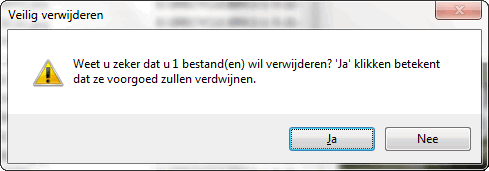
Besides restoring files Recuva can also be used to delete files permanently so that they no longer repairable. This can prevent sensitive files will to be opened by other people.
The program can be downloaded from the site Piriform.
Go to where you saved Recuva rcsetupxxx.exe and click the file to begin installation.

At the beginning of the installation you can select english, after the installation, this can be changed in Options.

Automatically check for updates for Recuva you better leave it checked, then you have always the last update of the program.

We will not use the wizard, the program is easy to set.
On the desktop is a shortcut added, click it to start to Recuva.


After scanning, we get a list of images. Besides the file is a colored bullet that displays the status.
From the list we retrieve the first image.
On the right we get a preview of the image.

For files with an orange bullit is this interesting, you can then check the condition and how many clusters there are overwritten from the file.
With Recuva can folders from the hard drives removed so that they do not return to repair. This can prevent sensitive files, they can not opened by other people.

Designed by kaZzu.be
Filesharing MP3 PC Cleanup Spyware Software Contact
© PChelpen 2004 - 2011 All rights reserved.